Sunset Leaf Granny Square Yoga Mat Bag Free Crochet Pattern
Sunset Leaf Granny Square Yoga Mat Bag Free Crochet Pattern
Introduction
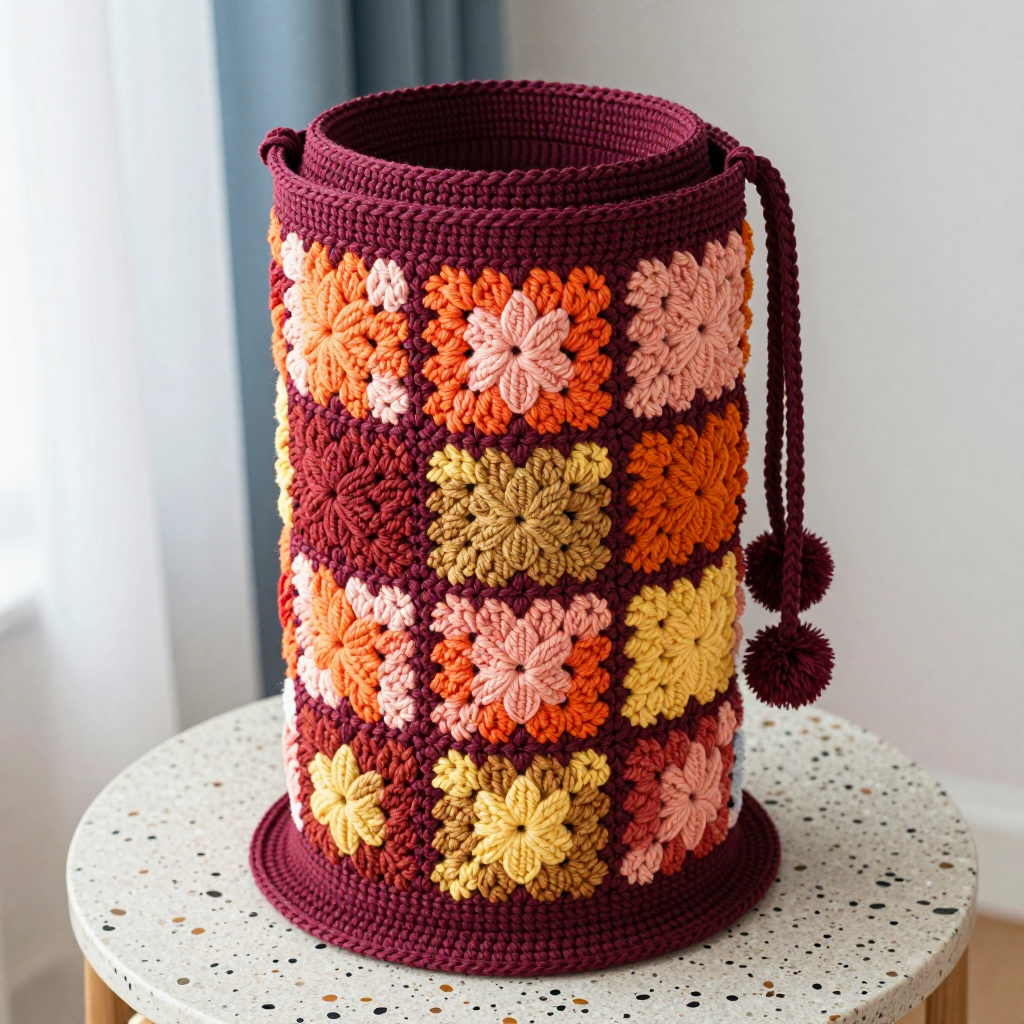
This cylindrical drawstring bag is made for anyone who loves a little folk-art charm with their fitness gear — it's a satisfying project for crocheters who are comfortable with the basic stitches and ready to try joining motifs. Twenty-four leaf-motif granny squares are worked in sunset-ombre stripes of deep orange, coral, peach, golden yellow, and burgundy, then stacked into a tall cylinder that fits a standard rolled yoga mat. The velvet yarn makes it feel soft and slightly plush in the hand, while the raised leaf points give the surface a lovely textured, handmade look. Carry it to class or hang it by the door — it's as pretty as it is practical.
Materials Needed
- Yarn: Worsted weight (CYC 4) velvet yarn, 100% polyester, approx. 200 yd (183 m) per 3.5 oz (100 g) skein. Colors: A (deep orange) 1 skein, B (coral) 1 skein, C (peach) 1 skein, D (golden yellow) 1 skein, E (burgundy) 1 skein. Total approx. 450 yd (411 m).
- Hook: 5.0 mm (US H-8) crochet hook
- Notions: Stitch marker, tapestry needle, scissors, blocking mats and pins, optional pom-pom maker
- Finished size: Approx. 6" (15 cm) diameter x 24" (61 cm) tall, excluding drawstring. Fits a standard yoga mat (24" x 6" rolled).
Abbreviations
- ch — chain
- sc — single crochet
- dc — double crochet
- sl st — slip stitch
- sp / sps — space / spaces
- st / sts — stitch / stitches
- MR — magic ring
- RS — right side
- dc3tog — double crochet 3 together: [yo, insert hook in next st, yo, pull up loop, yo, pull through 2 loops] 3 times, yo, pull through all 4 loops on hook
- Shell — (2 dc, ch 2, 2 dc) in the same space
Gauge
One leaf granny square = 4" (10 cm) square after blocking; the base works up at 6 sc and 6 rnds = 2" (5 cm). Make one square first, block it, and measure across the center — if it's larger than 4", go down a hook size; if smaller, go up.
Tips Before You Start
- Velvet yarn can shed and "worm" (loosen) with frogging, so work each square carefully and avoid ripping back more than necessary.
- Block every square to exactly 4" before joining — consistent squares are what keep the cylinder straight and even.
- Lay out all 24 squares in their color stripes before you join anything, so you can balance the ombre from bottom to top.
- Keep your joining stitches loose; tight joins will pucker the cylinder and make it hard to slide the mat in.
Step-by-Step Instructions
Leaf Granny Square (make 24; 6 each in color combos A/B, B/C, C/D, D/E)
Work Rnds 1–4 in the first color, then change to the second color for Rnds 5–6.
Set-up: With first color, MR 6 sc. Join with sl st to first sc. (6 sc)
Rnd 1: Ch 3 (counts as dc), dc in same st, ch 2, [2 dc in next sc, ch 2] 5 times. Join with sl st to top of ch-3. (12 dc, 6 ch-2 sps)
Rnd 2: Sl st to first ch-2 sp, ch 3, (2 dc, ch 2, 2 dc) in same sp (shell made), ch 1, *shell in next ch-2 sp, ch 1; rep from * around. Join with sl st to top of ch-3. (6 shells, 6 ch-1 sps)
Rnd 3: Sl st to first ch-2 sp, ch 3, (2 dc, ch 2, 2 dc) in same sp, ch 1, 3 dc in next ch-1 sp, ch 1, *shell in next ch-2 sp, ch 1, 3 dc in next ch-1 sp, ch 1; rep from * around. Join with sl st to top of ch-3. (6 shells, 6 groups of 3 dc)
Rnd 4: Sl st to first ch-2 sp, ch 3, (2 dc, ch 2, 2 dc) in same sp, ch 1, 3 dc in next ch-1 sp, ch 1, 3 dc in next ch-1 sp, ch 1, *shell in next ch-2 sp, ch 1, 3 dc in next ch-1 sp, ch 1, 3 dc in next ch-1 sp, ch 1; rep from * around. Join with sl st to top of ch-3. (6 shells, 12 groups of 3 dc)
Rnd 5 (leaf motif): Ch 1, sc in each dc and ch-1 sp around, working 3 sc in each ch-2 sp. Join with sl st to first sc. (60 sc)
Rnd 6: Ch 1, sc in each sc around, but work dc3tog over the center 3 sc of each leaf (i.e., at each point where a shell was made in Rnd 4, skip the center sc and dc3tog over the 3 sc that correspond to the shell's center). Join with sl st to first sc. (54 sc)
Fasten off. Weave in ends. Block squares to 4" (10 cm).
Base (color E)
Set-up: MR 6 sc. Join with sl st to first sc. (6 sc)
Rnd 1: Ch 1, 2 sc in each sc around. Join. (12 sc)
Rnd 2: Ch 1, [sc in next sc, 2 sc in next sc] around. Join. (18 sc)
Rnd 3: Ch 1, [sc in next 2 sc, 2 sc in next sc] around. Join. (24 sc)
Rnd 4: Ch 1, [sc in next 3 sc, 2 sc in next sc] around. Join. (30 sc)
Rnd 5: Ch 1, [sc in next 4 sc, 2 sc in next sc] around. Join. (36 sc)
Rnd 6: Ch 1, [sc in next 5 sc, 2 sc in next sc] around. Join. (42 sc)
Rnd 7: Ch 1, [sc in next 6 sc, 2 sc in next sc] around. Join. (48 sc)
Rnd 8: Ch 1, [sc in next 7 sc, 2 sc in next sc] around. Join. (54 sc)
Rnd 9: Ch 1, sc in each sc around. Join. (54 sc)
Do not fasten off.
Body
Rnd 1: Ch 1, sc in each sc around, joining squares as you go: hold first square with RS facing, align one edge with base edge, work sc through both layers of square edge and base sc, then continue sc in base sc between squares. Join squares in a ring of 6 squares around the base, then join the next round of 6 squares above, then a third round of 6 squares above that, forming a cylinder. (54 sc per round; 3 rounds of squares = 12" (30.5 cm) tall)
Rnd 2: After all squares are joined, work 1 rnd sc in each sc around top edge. Join. (54 sc)
Top Edging (color E)
Rnd 1: Ch 1, sc in each sc around. Join. (54 sc)
Rnd 2: Ch 1, [sc in next 7 sc, ch 3, skip next 2 sc] around, ending with sc in last 7 sc. Join. (6 ch-3 sps)
Rnd 3: Ch 1, sc in each sc and in each ch-3 sp around. Join. (54 sc)
Rnd 4: Ch 1, sc in each sc around. Join. Fasten off.
Drawstring Cord (color E)
Cut 3 strands of yarn, each 60" (152 cm) long. Braid together. Knot each end. Weave braid through the ch-3 sps of Rnd 2 of the top edging.
Assembly and Finishing
Sew the base to the bottom edge of the body using mattress stitch, matching sts. Weave in all ends. Block the bag lightly, shaping the cylinder while damp and letting it dry fully. Optionally, make a small pom-pom and attach it to one end of the drawstring, then weave in any remaining ends.
Pro Tips and Variations
- Swap the sunset palette for cool blues and greens for a "lagoon leaf" version that reads more modern.
- Add a simple chain-loop strap at the top edge if you prefer to carry the bag over your shoulder.
- Work the base in a contrasting color (like golden yellow) to make the bottom pop when the bag is set down.