Harvest Pumpkin Granny Square Free Crochet Pattern
Harvest Pumpkin Granny Square Free Crochet Pattern
Introduction
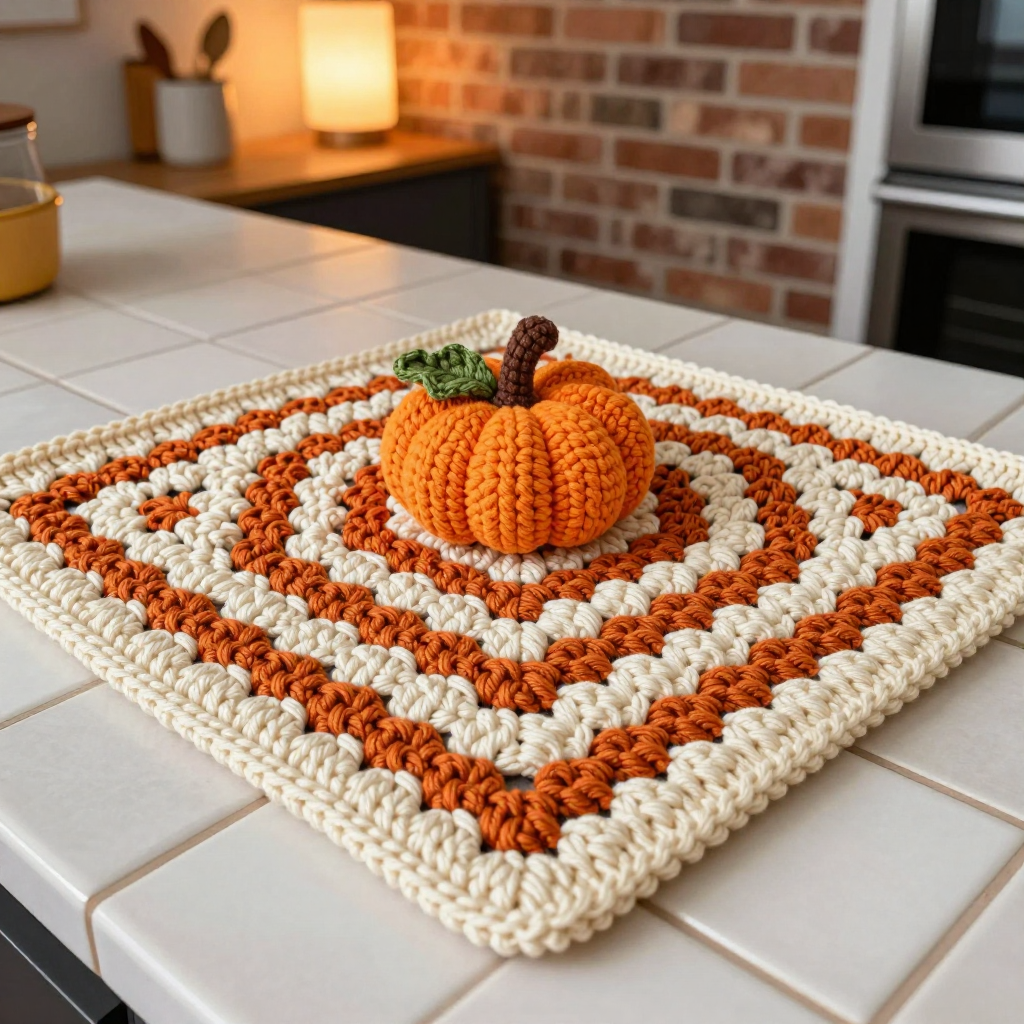
This vintage-inspired granny square puts a tiny stuffed pumpkin right at its heart, framed by classic cream and burnt orange cluster rounds. It is written for crocheters who are comfortable with basic stitches and ready for a fun little bit of shaping and stuffing. The finished block is a flat 7.25-inch square with a raised, rounded pumpkin medallion, complete with a brown stem and a little green leaf, sitting proudly in the middle. It feels cozy and nostalgic, like a 1970s autumn afghan, and it works up quickly enough to make a whole blanket of them.
Materials Needed
- Yarn: Worsted weight (4) acrylic or cotton in five colors:
- Color A (orange): 30 yds
- Color B (brown): 5 yds
- Color C (green): 5 yds
- Color D (cream): 20 yds
- Color E (burnt orange): 15 yds
- Hook: 5.0 mm (H/8)
- Notions: yarn needle, scissors, a small amount of polyester fiberfill for stuffing the pumpkin
- Finished size: 7.25 inches by 7.25 inches
Abbreviations
- MR: magic ring, an adjustable loop you work stitches into
- sc: single crochet
- dc: double crochet
- ch: chain
- sl st: slip stitch
- inc: increase, work 2 sc in the same stitch
- dec: decrease, work 2 sc together into 1 stitch
- sp: space
- st(s): stitch(es)
- rep: repeat
Gauge
16 sts and 9 rnds = 4 inches in double crochet. Work a small swatch in dc and measure it; if your square comes out larger or smaller than 7.25 inches, adjust your hook size.
Tips Before You Start
- Stuff the pumpkin lightly and evenly before the final decrease round so it stays rounded without bulging through the stitches.
- Keep your cluster rounds relaxed. Tight ch-1 and ch-2 spaces make the square pull in and lose its flat shape.
- Join each new color in a corner space whenever possible so the color changes hide neatly.
- Count your 3-dc clusters at the end of each round; each side should gain one cluster per round.
Step-by-Step Instructions
Pumpkin Center (Color A)
Rnd 1: MR, 6 sc into the ring, join (6 sts).
Rnd 2: inc in each st around (12 sts).
Rnd 3: [sc, inc] x6 (18 sts).
Rnd 4: sc in each st around (18 sts).
Rnd 5: [sc, dec] x6 (12 sts). Stuff lightly with fiberfill.
Rnd 6: dec x6 (6 sts). Fasten off, leaving a short tail.
Stem (Color B)
Join B to the top of the pumpkin. Stem: ch 2, 3 dc in the same space, sl st to the top of the ch. Fasten off.
Leaf (Color C)
Join C to the side of the stem. Leaf: ch 3, 2 dc in the same space, ch 3, sl st in the same space. Fasten off.
Square (Colors D and E)
Join D to any stitch of the pumpkin's Rnd 4.
Rnd 1: ch 3 (counts as dc), 2 dc in the same st, [ch 2, 3 dc in next st] around, join with sl st to top of ch 3 (4 corners, 3 dc each side).
Rnd 2: sl st to corner sp, ch 3, 2 dc in same sp, ch 2, 3 dc in same sp, *ch 1, 3 dc in next sp, ch 1, 3 dc in next corner sp, ch 2, 3 dc in same sp; rep from * around, join.
Rnd 3: sl st to corner sp, ch 3, 2 dc in same sp, ch 2, 3 dc in same sp, *ch 1, 3 dc in next sp, ch 1, 3 dc in next sp, ch 1, 3 dc in next corner sp, ch 2, 3 dc in same sp; rep from * around, join. Change to E.
Rnd 4: sl st to corner sp, ch 3, 2 dc in same sp, ch 2, 3 dc in same sp, *ch 1, 3 dc in each sp across to next corner, ch 1, 3 dc in corner sp, ch 2, 3 dc in same sp; rep from * around, join. Change to D.
Rnd 5: sl st to corner sp, ch 3, 2 dc in same sp, ch 2, 3 dc in same sp, *ch 1, 3 dc in each sp across to next corner, ch 1, 3 dc in corner sp, ch 2, 3 dc in same sp; rep from * around, join. Fasten off.
Assembly and Finishing
Weave in all ends on the wrong side, using the yarn needle to tuck the pumpkin and stem tails inside the medallion. Gently shape the square with your hands, then block it lightly by misting with water and pinning it to 7.25 inches square. Let it dry completely before joining squares for a blanket.
Pro Tips and Variations
- Swap the cream for a deep mustard or sage green for a different autumn palette.
- Add a sixth round in a contrasting color to make a larger 8-inch block for a bigger blanket.
- Use a tiny scrap of orange embroidery floss to add pumpkin ridges before stuffing for extra detail.