Crochet Dragonfly Paperclips Free Pattern
Introduction
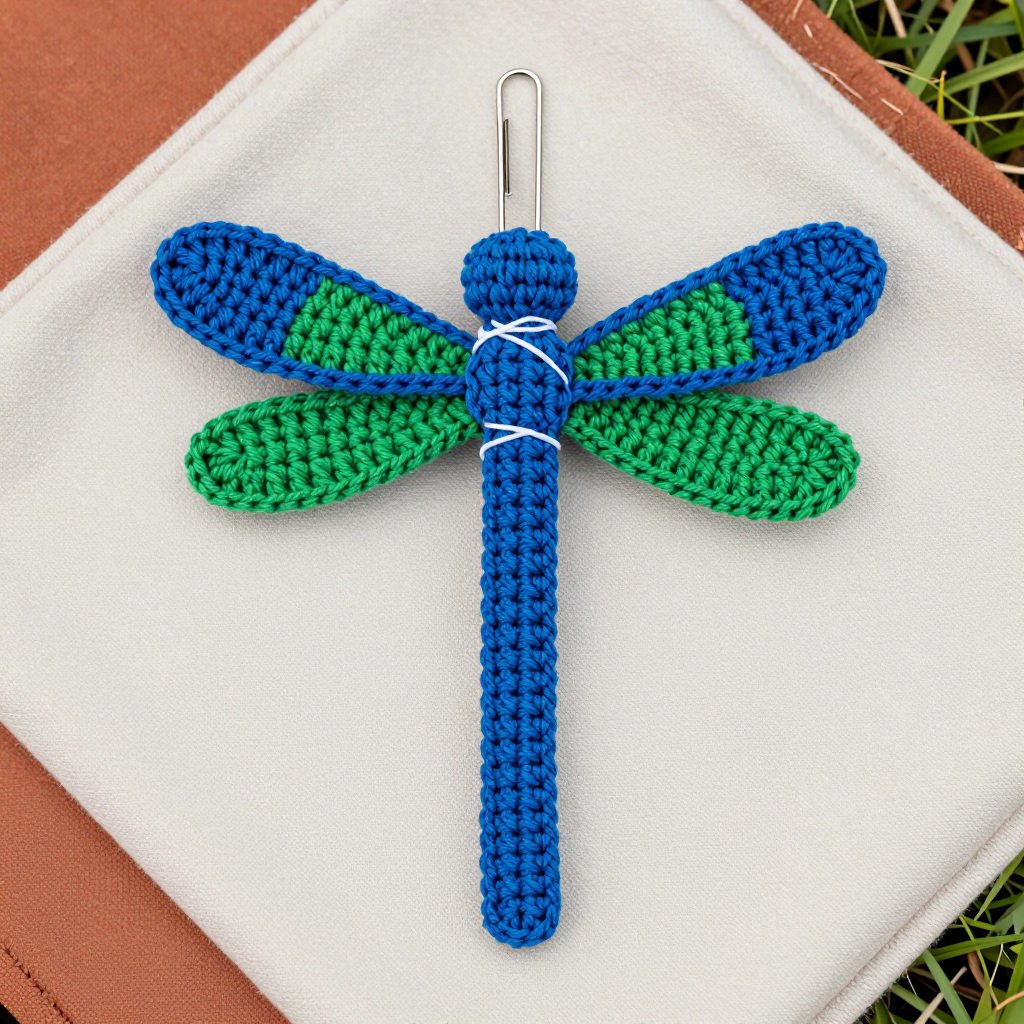
This little dragonfly paperclip is the sweetest way to add a touch of fairycore magic to your stationery. It's made from fine cotton thread and a tiny steel hook, so it works up in a single cozy sitting and uses only scraps of yarn. The result is a delicate blue body with a round head and four little wings—two blue, two green—that flutter at a gentle angle. At just 1.5 inches long with a 2-inch wingspan, it clips onto a standard paperclip and turns any notebook, planner, or journal page into something special. If you can single crochet and make a magic ring, you can make this dragonfly.
Materials Needed
- Yarn: Lace weight (0) crochet thread, size 10, 100% cotton. Small amounts of blue (MC) and green (CC), approximately 5 yards each.
- Hook: 1.5 mm steel hook (US 8).
- Notions: Tapestry needle, small amount of polyester fiberfill for the head, scissors, one standard silver paperclip (1.25 inches / 3.2 cm).
- Finished size: Body 1.5 inches (3.8 cm) long; wingspan 2 inches (5 cm); fits a standard paperclip.
Abbreviations
- ch – chain
- sc – single crochet
- sc2tog – single crochet two stitches together (a decrease)
- inc – increase (work 2 sc in the same stitch)
- sl st – slip stitch
- MR – magic ring
- st(s) – stitch(es)
- MC – main color (blue)
- CC – contrasting color (green)
Gauge
16 sc x 20 rows = 1 inch (2.5 cm) in single crochet. Work a small swatch and measure it; if your stitches are larger than this, go down a hook size so the dragonfly stays tiny.
Tips Before You Start
- Thread is thin and can split, so use a steel hook with a smooth throat and keep your tension light and even.
- Work the body flat and turn at the end of each row; the tapered strip is meant to be a flat piece, not a tube.
- Leave a 6-inch tail on the head for sewing, and don't overstuff it—a light pinch of fiberfill is plenty.
- Make all four wings before assembling so you can pair one blue and one green on each side.
Step-by-Step Instructions
Body (MC)
Row 1: Ch 12, sc in 2nd ch from hook and each ch across (11 sts).
Rows 2-3: Sc in each st across (11 sts).
Row 4: Sc2tog, sc in next 7, sc2tog (9 sts).
Row 5: Sc in each st across (9 sts).
Row 6: Sc2tog, sc in next 5, sc2tog (7 sts).
Row 7: Sc in each st across (7 sts).
Row 8: Sc2tog, sc in next 3, sc2tog (5 sts).
Row 9: Sc in each st across (5 sts).
Row 10: Sc2tog, sc in next 1, sc2tog (3 sts).
Row 11: Sc in each st across (3 sts).
Row 12: Sc2tog, sc (2 sts).
Row 13: Sc2tog (1 st). Fasten off.
Head (MC)
Rnd 1: MR, 6 sc into the ring (6 sts).
Rnd 2: Inc in each st around (12 sts).
Rnd 3: Sc in each st around (12 sts).
Rnd 4: [Sc2tog] x6 (6 sts). Stuff lightly with fiberfill. Fasten off, leaving a tail for sewing.
Wings (make 4: 2 with MC, 2 with CC)
Row 1: Ch 6, sc in 2nd ch from hook, sc in next 3, 3 sc in last ch, turn, sc in next 4, sl st in first sc. Fasten off.
Assembly and Finishing
Sew the head to the body at Row 1 of the body (the wide end), using the tail you left. Sew two wings—one MC and one CC—to each side of the body at Rows 2-3, then sew the remaining two wings at Rows 5-6, angling them slightly so the pairs fan out. Weave in all ends. To attach to the paperclip, cut a 6-inch length of thread and tie one end to the paperclip at the top curve. Wrap the thread tightly around the paperclip and around the dragonfly body at Rows 7-8 several times to secure, then tie off firmly and weave in the ends. Gently shape the wings and body with your fingers; no blocking is needed, but you can lightly mist and press the wings flat if they curl.
Pro Tips and Variations
- Swap the colors for a pastel set—lavender and mint, or pink and gold thread—to match different planners.
- Add a tiny seed bead to each wingtip for a sparkly fairycore touch.
- Make a whole swarm in an evening and use them as gift toppers, bookmark clips, or party favors.