White Cable-Look Button Cloche Free Crochet Pattern
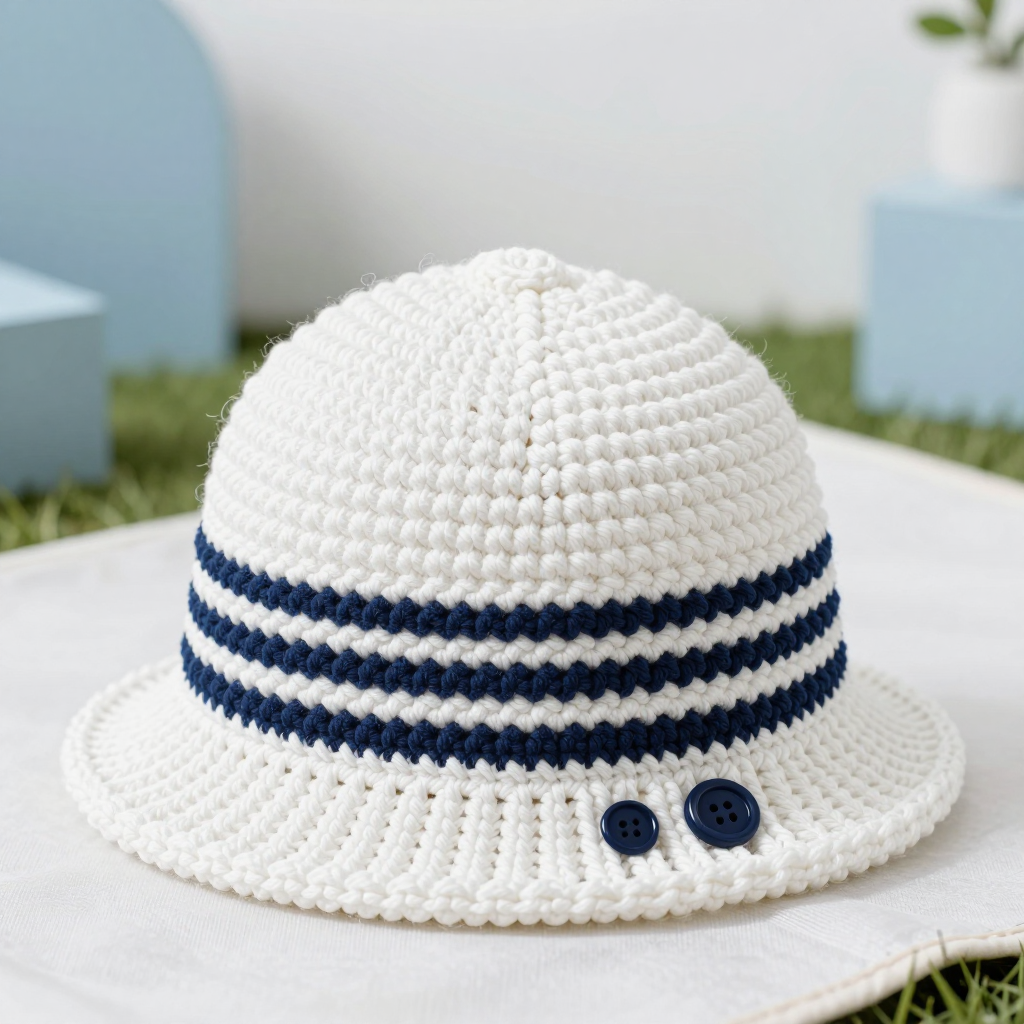
White Cable-Look Button Cloche Free Crochet Pattern
Introduction
This preppy white cloche is the perfect project for anyone who wants a polished, boutique-style hat without tackling a real cable chart. The deep ribbed brim gives it that classic 1920s silhouette, while two crisp navy stripes and a pair of navy buttons add a smart, tailored touch. The cable-look texture comes from simple front post double crochet stitches, so if you can work a double crochet, you can make this hat. Worked in bulky yarn, it comes together quickly and feels soft, warm, and structured enough to hold its shape all season.
Materials Needed
- Yarn: Bulky (5) weight yarn — approx. 120 yds white (Color A) and 20 yds navy (Color B). A smooth acrylic or wool-blend bulky works best for stitch definition.
- Hook: 5.5 mm (I-9) crochet hook
- Notions: Tapestry needle, stitch marker, measuring tape, two navy buttons (about 3/4 inch), sewing needle and thread
- Finished size: Adult, approx. 21 inch circumference and 8.5 inches tall
Abbreviations
- ch — chain
- sc — single crochet
- dc — double crochet
- fpdc — front post double crochet (work the dc around the post of the stitch below, from the front, instead of into the top loops)
- dc2tog — double crochet two stitches together (a decrease)
- sl st — slip stitch
- st(s) — stitch(es)
- rep — repeat
- rnd — round
Gauge
8 stitches and 5 rows = 4 inches in double crochet. Work a small swatch in dc and measure a 4-inch section; adjust your hook size if you have more or fewer stitches than 8 per 4 inches.
Tips Before You Start
- Work the brim in the back loop only every row — this is what creates the deep ribbed texture. Keep your tension even so the band stays about 2 inches wide.
- When you join the brim into a ring, turn it inside out so the ribbing faces outward before you begin the body.
- Count your 48 single crochets around the brim edge carefully; the whole body depends on this number.
- Carry or change colors at the join, and keep the front post stitches loose enough that the cable-look texture pops without puckering.
Step-by-Step Instructions
Brim (Color A)
Row 1: Ch 9, sc in 2nd ch from hook and each ch across (8 sts).
Row 2: Ch 1, turn, sc in back loop only of each st across (8 sts).
Rows 3–end: Rep Row 2 until piece measures 21 inches, ending with a row. Do not fasten off. Join short ends with sl st to form a ring. Turn ring inside out.
Body (worked in joined rounds)
Rnd 1: Ch 1, work 48 sc evenly around brim edge, join with sl st to first sc (48 sts).
Rnd 2: Ch 2 (counts as first dc), dc in each st around, join with sl st to top of ch-2 (48 sts).
Rnd 3: Ch 2, dc in next st, *fpdc around next st, dc in next 2 sts; rep from * around, ending with fpdc around last st, join (48 sts).
Rnds 4–5: Rep Rnd 3 (48 sts).
Change to Color B.
Rnds 6–7: Ch 2, dc in each st around, join (48 sts).
Change to Color A.
Rnds 8–10: Ch 2, dc in each st around, join (48 sts).
Change to Color B.
Rnds 11–12: Ch 2, dc in each st around, join (48 sts).
Change to Color A.
Rnd 13: Ch 2, dc in each st around, join (48 sts).
Rnd 14: Ch 2, dc2tog, dc in next 14 sts, dc2tog, dc in next 14 sts, dc2tog, dc in next 14 sts, join (45 sts).
Rnd 15: Ch 2, dc in each st around, join (45 sts).
Rnd 16: Ch 2, dc2tog, dc in next 13 sts, dc2tog, dc in next 13 sts, dc2tog, dc in next 13 sts, join (42 sts).
Rnd 17: Ch 2, dc in each st around, join (42 sts).
Rnd 18: Ch 2, dc2tog, dc in next 12 sts, dc2tog, dc in next 12 sts, dc2tog, dc in next 12 sts, join (39 sts).
Rnd 19: Ch 2, dc in each st around, join (39 sts).
Rnd 20: Ch 2, dc2tog, dc in next 11 sts, dc2tog, dc in next 11 sts, dc2tog, dc in next 11 sts, join (36 sts).
Rnd 21: Ch 2, dc in each st around, join (36 sts).
Rnd 22: Ch 2, dc2tog, dc in next 10 sts, dc2tog, dc in next 10 sts, dc2tog, dc in next 10 sts, join (33 sts).
Rnd 23: Ch 2, dc in each st around, join (33 sts).
Rnd 24: Ch 2, dc2tog, dc in next 9 sts, dc2tog, dc in next 9 sts, dc2tog, dc in next 9 sts, join (30 sts).
Rnd 25: Ch 2, dc in each st around, join (30 sts).
Rnd 26: Ch 2, dc2tog, dc in next 8 sts, dc2tog, dc in next 8 sts, dc2tog, dc in next 8 sts, join (27 sts).
Rnd 27: Ch 2, dc in each st around, join (27 sts).
Rnd 28: Ch 2, dc2tog, dc in next 7 sts, dc2tog, dc in next 7 sts, dc2tog, dc in next 7 sts, join (24 sts).
Rnd 29: Ch 2, dc in each st around, join (24 sts).
Rnd 30: Ch 2, dc2tog, dc in next 6 sts, dc2tog, dc in next 6 sts, dc2tog, dc in next 6 sts, join (21 sts).
Rnd 31: Ch 2, dc in each st around, join (21 sts).
Rnd 32: Ch 2, dc2tog, dc in next 5 sts, dc2tog, dc in next 5 sts, dc2tog, dc in next 5 sts, join (18 sts).
Rnd 33: Ch 2, dc in each st around, join (18 sts).
Rnd 34: Ch 2, dc2tog, dc in next 4 sts, dc2tog, dc in next 4 sts, dc2tog, dc in next 4 sts, join (15 sts).
Rnd 35: Ch 2, dc in each st around, join (15 sts).
Rnd 36: Ch 2, dc2tog, dc in next 3 sts, dc2tog, dc in next 3 sts, dc2tog, dc in next 3 sts, join (12 sts).
Rnd 37: Ch 2, dc2tog around, join (6 sts). Fasten off, leaving a long tail. Weave tail through remaining 6 sts and pull tight to close.
Assembly and Finishing
Weave in all ends on the inside of the hat. Sew the two navy buttons to the brim, centered, about 1 inch apart and 1 inch from the bottom edge. Lightly steam or block the hat over a bowl or hat form to smooth the crown and even out the ribbed brim; avoid pressing the front post texture flat.
Pro Tips and Variations
- Swap the navy stripes for burgundy, forest green, or camel for a different preppy palette.
- Add a third navy stripe near the brim for a bolder look, keeping the same stitch counts.
- For a slouchier fit, stop the crown decreases a few rounds earlier and close the top with a larger gathered opening.


