Vintage Charcoal Tablet Sleeve with Oatmeal Border Free Crochet Pattern
Introduction
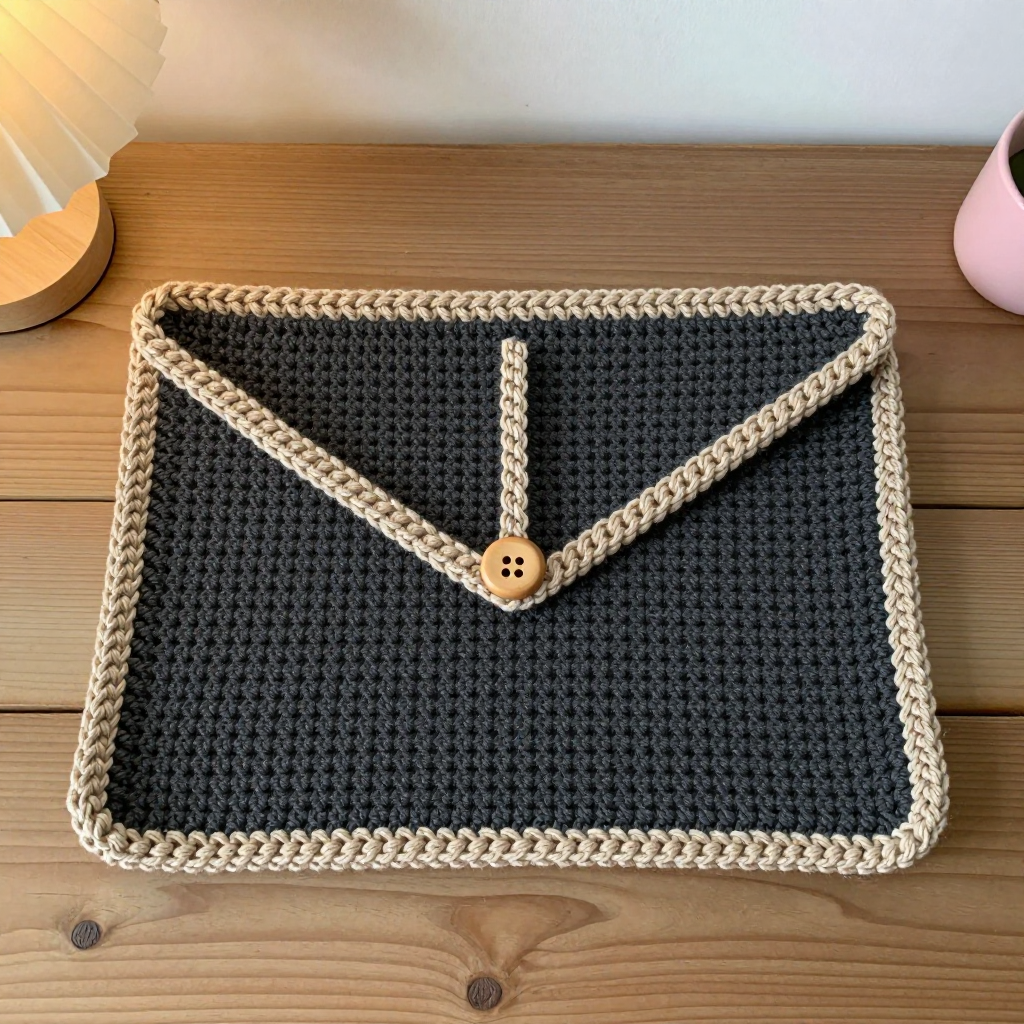
This Vintage Charcoal Tablet Sleeve is the perfect first "real" project for a new crocheter who wants something useful to show off. It's made from one simple double crochet rectangle that gets folded in half and seamed up the sides, so there's no shaping, no complicated stitchwork, and no stress. The charcoal body with its chunky oatmeal border and a single wooden button gives it that warm, 1970s handmade look that never really goes out of style. The finished sleeve is soft but sturdy, a flat envelope pouch that slips easily into a tote bag and keeps your tablet cozy and scratch-free.
Materials Needed
- Yarn: Worsted weight (category 4) acrylic yarn — approximately 150 yards charcoal (Color A) and 50 yards oatmeal (Color B).
- Hook: 5.0 mm (US H-8) crochet hook.
- Notions: Tapestry needle for seaming and weaving in ends, scissors, one wooden button (about 1 inch / 2.5 cm), and a stitch marker (optional).
- Finished size: Approximately 8 inches wide by 10 inches tall (20 cm x 25 cm), fitting most 9–10 inch tablets.
Abbreviations
- ch — chain: yarn over and pull through the loop on your hook.
- dc — double crochet: yarn over, insert hook in stitch, pull up a loop, yarn over and pull through two loops, yarn over and pull through the last two loops.
- sc — single crochet: insert hook in stitch, pull up a loop, yarn over and pull through both loops.
- sl st — slip stitch: insert hook in stitch, yarn over and pull through both the stitch and the loop on your hook.
- st(s) — stitch(es).
- rnd — round (worked in a circle).
Gauge
14 double crochet stitches and 8 rows = 4 inches (10 cm). To check, crochet a small swatch in double crochet, measure a 4-inch section, and adjust your hook size up or down if you have too few or too many stitches.
Tips Before You Start
- Make your gauge swatch first — the sleeve's finished size depends on it, and a slightly different hook size is an easy fix.
- Keep your turning chains loose so the side edges stay straight and easy to seam.
- Count your stitches at the end of every row; 28 dc per row keeps the rectangle square and the finished sleeve even.
- Before seaming, fold the rectangle and check it against your tablet — if you need a little more room, add one or two extra rows before fastening off.
Step-by-Step Instructions
Main Piece (Color A)
Row 1: Ch 30, dc in the 3rd ch from hook and in each ch across (28 dc).
Rows 2–20: Ch 2, turn, dc in each st across (28 dc).
Fasten off and weave in ends.
Folding and Side Seams
Fold the piece in half with right sides together, matching the short ends. Seam both sides using single crochet or whipstitch, leaving the top open. Turn right side out.
Border (Color B)
Join Color B at the top right corner of the opening.
Rnd 1: Sc evenly around the entire top opening, working 1 sc in each stitch and 1 sc in each row end along the sides, join with sl st to the first sc.
Fasten off and weave in ends.
Button Loop (Color B)
Join Color B at the top center of the back panel. Ch 12, sl st to form a loop, fasten off. Sew the button to the front panel opposite the loop.
Edging (Color B, Optional)
Sc around the entire outer edge of the sleeve for a finished look, join with sl st. Fasten off and weave in ends.
Assembly and Finishing
If you haven't already, seam both sides of the folded rectangle with a simple whipstitch or single crochet, working from the bottom corners up toward the opening and leaving the top open. Turn the sleeve right side out so the seams sit inside. Weave in all remaining ends on the wrong side, threading each tail through a few stitches before trimming. Sew the wooden button firmly to the front panel, directly opposite the button loop, checking that the loop reaches it comfortably. Block lightly by misting with water and patting flat, then let it dry fully before use.
Pro Tips and Variations
- Make it striped: Work a few rows in oatmeal near the top of the main piece for a vintage color-blocked look.
- Add a lining: Cut a piece of soft cotton fabric slightly smaller than the sleeve and hand-sew it inside for extra protection.
- Scale it up or down: Add or remove chains in multiples of 2 to fit larger tablets, and adjust the row count to keep the fold even.