Mustard Waffle Grid with Mushroom Corners Crochet Free Pattern
Introduction
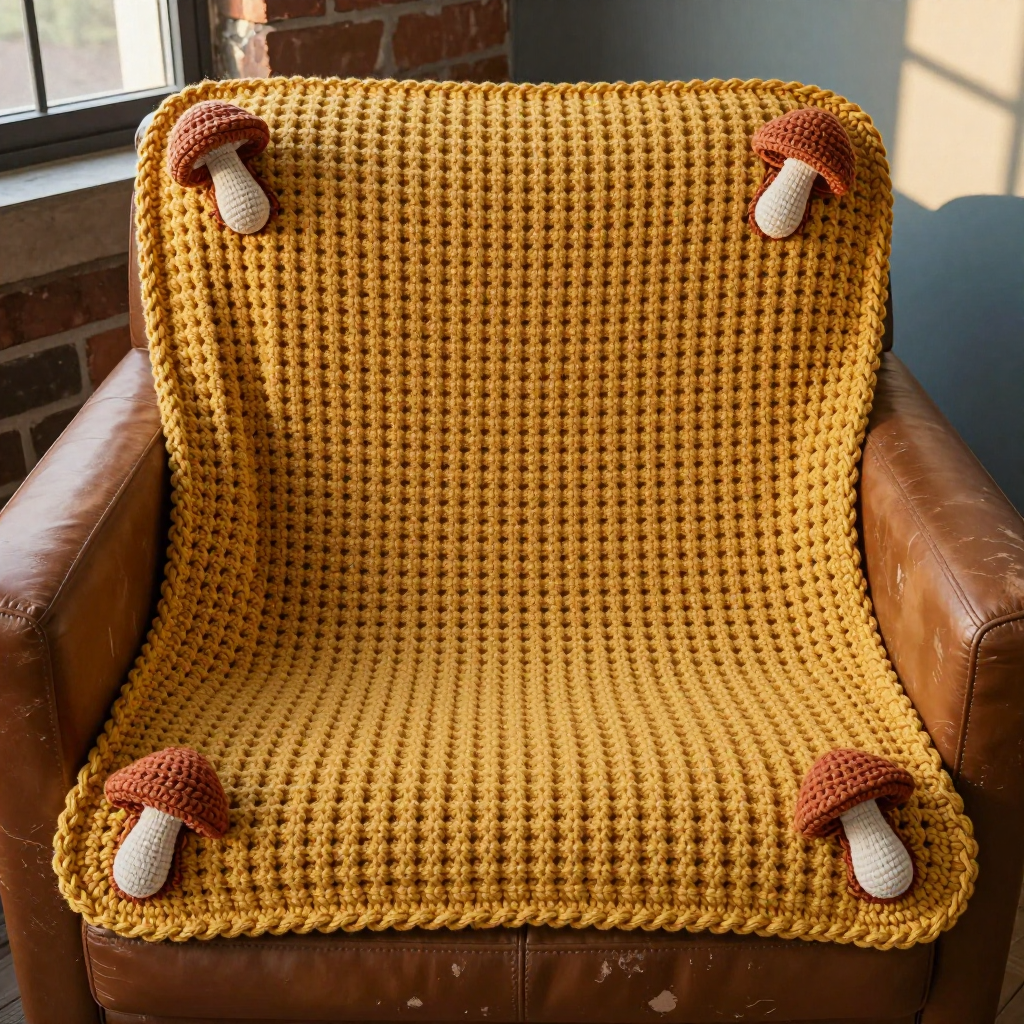
This mustard waffle grid baby blanket with mushroom corners is a cozy, textured project made for little ones and the people who love them. The raised waffle grid gives the whole blanket a puffy, dimensional surface that feels warm and squishy in the hand, while four small terracotta mushrooms tucked near the corners add a playful, storybook touch. Worked in worsted-weight cotton, it is breathable enough for a baby and sturdy enough to survive years of snuggles and washes. If you can work double crochet and a front-post double crochet, you can make this blanket.
Materials Needed
- Yarn: Worsted weight (Category 4) cotton yarn. Color A (mustard): 750 yards. Color B (terracotta): 100 yards.
- Hook: 5.0 mm (US H-8) crochet hook.
- Notions: Stitch marker, tapestry needle, scissors, small amount of polyester fiberfill for stuffing the mushrooms.
- Finished size: 30 inches (76 cm) wide x 36 inches (91 cm) long, excluding the mushrooms.
Abbreviations
- ch – chain
- dc – double crochet
- FPdc – front-post double crochet: work a double crochet around the post of the stitch below, from the front, so it pops forward
- sc – single crochet
- inc – increase: work 2 single crochet in the same stitch
- dec – decrease: work 2 single crochet together into one stitch
- MR – magic ring (adjustable ring)
- sl st – slip stitch
- st(s) – stitch(es)
- rep – repeat
Gauge
14 stitches and 8 rows = 4 inches (10 cm) in waffle stitch pattern. To check, crochet a small swatch of the waffle pattern and measure a 4-inch section in the middle; adjust your hook size if you have too many or too few stitches.
Tips Before You Start
- Keep your turning chains loose. A tight ch 3 at the start of each row makes the blanket edges pull in and narrows the finished width.
- Count your stitches at the end of every row. The waffle pattern shifts the FPdc position each row, so a missed stitch is easy to spot only after several rows.
- Work the mushrooms with a slightly tighter tension than the blanket so the stuffing does not show through the single crochet fabric.
- Stuff the mushrooms lightly. Overstuffing stretches the cap and makes the shape lumpy instead of domed.
Step-by-Step Instructions
Blanket (Color A)
Row 1: Ch 106. Dc in 4th ch from hook and in each ch across. (104 dc)
Row 2: Ch 3 (counts as first dc), turn. Dc in next st, *FPdc in next st, dc in next 2 sts; rep from * to last st, dc in last st. (104 sts)
Row 3: Ch 3, turn. Dc in next st, *dc in next st, FPdc in next st, dc in next st; rep from * to last 2 sts, dc in last 2 sts. (104 sts)
Row 4: Ch 3, turn. Dc in next st, *FPdc in next st, dc in next 2 sts; rep from * to last st, dc in last st. (104 sts)
Rows 5-72: Rep Rows 3-4 alternately. (104 sts per row)
Fasten off.
Mushroom Cap (Color B) (make 4)
Rnd 1: MR 6 sc. (6)
Rnd 2: Inc in each st around. (12)
Rnd 3: *Sc in next st, inc in next st; rep from * around. (18)
Rnd 4: *Sc in next 2 sts, inc in next st; rep from * around. (24)
Rnd 5: *Sc in next 3 sts, inc in next st; rep from * around. (30)
Rnd 6: Sc in each st around. (30)
Rnd 7: *Sc in next 3 sts, dec in next st; rep from * around. (24)
Rnd 8: *Sc in next 2 sts, dec in next st; rep from * around. (18)
Rnd 9: *Sc in next st, dec in next st; rep from * around. (12)
Stuff lightly.
Rnd 10: Dec in each st around. (6)
Fasten off, leaving a long tail for sewing.
Mushroom Stem (Color B) (make 4)
Rnd 1: MR 6 sc. (6)
Rnd 2: Sc in each st around. (6)
Rnd 3: *Sc in next 2 sts, inc in next st; rep from * around. (8)
Rnd 4: Sc in each st around. (8)
Rnd 5: *Sc in next 3 sts, inc in next st; rep from * around. (10)
Rnd 6: Sc in each st around. (10)
Fasten off, leaving a long tail for sewing.
Assembly of Mushrooms
Sew one stem to each cap using the tail, stuffing the stem lightly before closing. Position one mushroom at each corner of the blanket, about 2 inches from the edges. Sew in place using Color B.
Edging
Rnd 1: With Color A, join yarn at any corner. Sc evenly around the entire blanket, working 3 sc in each corner. Join with sl st to first sc. Fasten off. Weave in ends.
Assembly and Finishing
Weave in all loose ends on the wrong side of the blanket, threading each tail through a few stitches before trimming. Sew the mushrooms securely with several passes of terracotta yarn through the base of each stem so they stay put through washing. Block the blanket lightly by misting it with water and pinning it to the finished measurements (30 x 36 inches) on a flat surface; let it dry completely. Do not block the mushrooms flat—leave them puffy.
Pro Tips and Variations
- Swap the terracotta mushrooms for sage green or cream to change the mood from autumn to woodland-neutral.
- Add a second edging round of sc in Color B for a thin terracotta frame that ties the corners together.
- Make a larger version by chaining in multiples of 3 plus 1 and adding rows in pairs, keeping the waffle grid aligned.